Posts

Family Garden Update

Image
The Wordy Bit It seems there is no escaping the chaos of the world, no matter how sheltered we are privileged to be. It definitely takes a toll, and that's okay. I've slowed down my posting to allow more time for calmer things. Even nothing, to be honest. No noise; no electronics; I've taken to just sitting in the backyard, sipping on a cup of coffee, and basking in the natural world. Having grown up in the middle of nowhere, I find that immersing myself in nature really centers me. Having a garden has been helping a great deal, too. We're having difficulty getting decent veggies from out local grocer (but that could simply be due to whomever is gathering the groceries, since we're still socially distancing as much as possible). So the idea of fresh, beautiful ,herbs, fruits, and veggies is making us excited. I cut some fresh herbs for a recipe not long ago, and man oh man, were they fantastic (except the oregano; I cut it to experiment with drying it). Clockwise fr...

Super Easy No Churn Strawberry Ice Cream

Image
All You Need: 1 1/2 - 2 lbs strawberries, fresh or frozen (hulled and halved) 1-2 Tablespoons white, granulated sugar 2 cups heavy whipping cream 1 can (14 oz) Sweetened, Condensed Milk 1-2 teaspoons vanilla some sort of storage container, 7 cup capacity freezer food processor or blender a hand or stand mixer helps, too What You Do: First things first, we need to heighten the flavor of the strawberries while also removing the majority of the water from them. I do this in a two-step process:  I started by mixing my strawberries (I've used fresh and frozen) with sugar and placing them in the fridge to macerate. With fresh strawberries, this process can take 8-12 hours (or up to 24). With frozen strawberries, you're also wanting them to thaw, so it's best to give them a full 24 hours.  After they have sat in sugar for 24 hours, drain them as much as possible. But do not rinse them! And blend them in a food processor or with a blender. I have blended them...

First Year Family Garden

Image
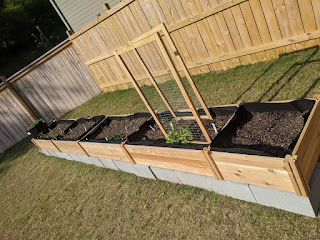
The Wordy Bit It's all wordy bit today. I know I haven't posted in a few weeks, and that was not intentional. I took a brief sabbatical from social media (and a lot of the internet, to be honest) over Mother's Day weekend. I needed the break from all the bonkers things I was seeing. I, instead, focused on my family, making phone calls, tending my garden, and taking in the quiet.  If you follow me on social media, I've shared my garden before. Even before all the pandemic madness began, my husband and I wanted to try our hand at gardening. We have an amazing portion of our backyard that gets sun from the moment it rises until just before it sets. We figured we would plant there, and since we didn't know how things would go, we decided for a raised garden. We used cinder blocks as our base, and on top of that we placed grow bags and surrounded them with a cedar frame (to help them hold their shape). We started with four plots that were 4' by 2', as well a...

Maker Basics - Not so Basic Stitches

Image
Materials: Yarn of choice Hook size recommended by yarn choice The Wordy Bit A couple weeks ago, I went over how to tie a slip knot, how to chain, and how to perform the single crochet. If you've got those down, and are ready for more complex stitches, then read on.  Slip stitches (which I haven't covered because they're still difficult for me) and single crochet stitches are "short" stitches. It takes lots of rows to get length. More complicated stitches like half-double crochet, double crochet, and treble crochet, are taller. This means is takes less rows to get height, but it also means an airier fabric, as the gaps in the yarn will be larger. Look at it this way: it take roughly 2-3 rows of single crochet to get the same height as you would get from 1 row of double crochet. The row heights and fabric density plays a huge role in designer's reason for choosing different stitches. We'll get into that more once we've discussed how to perform...

Is it Junk? Chicken Nuggets

Image
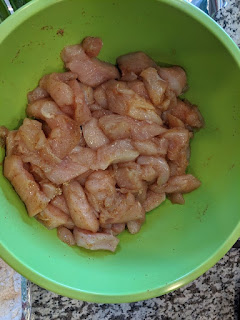
All You Need: 3-4 lbs boneless, skinless chicken breasts  4 large eggs, beaten 2 cups breadcrumbs 2 cups all purpose flour bowls seasoning of choice (about 1/4 cup total) baking sheets oven some sort of storage container freezer What You Do: Preheat oven to 350°. Cut chicken breasts into 1" pieces that are about 1/2" thick. Place cut chicken, flour, beaten eggs, and breadcrumbs in separate bowls and line them up in that order. At the end of your little assembly line, place your baking sheets. (Note: if you have a nonstick baking sheet, great! If not, any baking pan lined with parchment paper will work.)  Divide your seasoning (I use Tony Chachere's Creole Seasoning, but any spice mix or simple salt and pepper would work.) between the chicken, flour, eggs, and breadcrumbs. Mix the seasoning into each bowl completely. Here is a picture of my chicken, and then my assembly line. Using the "wet hand, dry hand" method*, dredge the chicken...

Maker Basics - Basic Stitches, B*tches

Image
Materials: Yarn Whatever size hook that is recommended by the yarn Scissors Patience The Wordy Bit Okay, so you've read over my broad-strokes on yarn. You went to the yarn store (online, hopefully) and found the yarn you want to create with. The label said you need a certain sized hook, so you got that, too....or you dove head first in and bought a bundle of hooks and notions. Either way, you've got yarn and hook in hand and you're ready to go! Right...? Well, if you're not, then this post may not be as informative as you were expecting. Maybe check back next week when I'm doling out my secrets on the perfect chicken nugget. Still here? Grab that yarn and hook, honey, and let's learn some basic stitches! The Slipknot Great band, but we're not here for the music. The foundation of any crochet project starts with a basic slipknot. So, I've got this picture here, and I'm going to explain my process. It seems simple to me, and I hope that...

Is it Junk? Jalapeno Poppers

Image
All You Need: Jalapeno (I use 10 large ones at a time) 2 blocks of cream cheese, softened 3 cups of shredded cheddar cheese  sheet pans oven freezer broiler What You Do: To Prep: Split peppers and remove membrane and seeds (unless you want them super spicy!). In a mixing bowl, combine cream cheese and shredded cheese. (I use my hands because it makes it go faster.) Stuff peppers with cheese mixture and lay flat on a baking sheet. Freeze for at leas 4 hours or until solid. This way, you can store them in a bag or stack them in a container without them freezing into a solid lump. To Cook: When ready to cook, remove the amount you want to make. Place them on a microwave safe dish and microwave at full power for 30 seconds. Set your oven broiler to 500°. Once the broiler is preheated, place peppers about 3 inches away from broiler (top rack) and watch. Depending on your oven and your peppers, this can take anywhere from 3-8 minutes. Remove peppers when they start...