Posts

Showing posts with the label crochet

Washable Water Balloons

Image
Materials: Bernat Blanket yarn  Size N/P hook (10.00mm) Tapestry needle (for weaving ends) Scissors Terms to Know: ch - chain st - stitch slst - slip stitch sc - single crochet dc - double crochet dc2tog - double crochet 2 together Pattern (written in US terms): Chain 3 Round 1: 8 DC in the third loop from the hook (Note: this is my "Magic Circle" shortcut); slst to join to the first st Round 2: Ch 2; 2 DC in each st all the way around; slst to join (16 total stitches in this round) Round 3: Ch 2; DC in each st all the way around; slst to join (16 sts total) Round 4:  Ch 2; DC in each st all the way around; slst to join (16 sts total) Round 5: Ch 2; DC2TOG all the way around; slst to join (8 sts total) Round 6: Ch 2; DC2TOG around; slst to join (4 sts total) Round 7: Ch 1; 2 SC in each st around; slst to join (8 sts total) Leave a long tail. Break the yarn and wrap the yarn several times around the "neck" of the balloon before tying off and weaving in the ends. (Thi...

Maker Basics - Basic Stitches, B*tches

Image
Materials: Yarn Whatever size hook that is recommended by the yarn Scissors Patience The Wordy Bit Okay, so you've read over my broad-strokes on yarn. You went to the yarn store (online, hopefully) and found the yarn you want to create with. The label said you need a certain sized hook, so you got that, too....or you dove head first in and bought a bundle of hooks and notions. Either way, you've got yarn and hook in hand and you're ready to go! Right...? Well, if you're not, then this post may not be as informative as you were expecting. Maybe check back next week when I'm doling out my secrets on the perfect chicken nugget. Still here? Grab that yarn and hook, honey, and let's learn some basic stitches! The Slipknot Great band, but we're not here for the music. The foundation of any crochet project starts with a basic slipknot. So, I've got this picture here, and I'm going to explain my process. It seems simple to me, and I hope that...

Wish Pack Costume Prop

Image
Materials: Worsted weight yarn in: yellow, red, aqua, and white Polyfil Cardboard circles (3-4 inch diameter) 3/4" buttons in yellow, red, and aqua Stitch Marker (place in each ch 1 and move every row after ss) Tapestry needle Scissors Terms to Know: MC - Magic Circle sc - single crochet ch - chain dc - double crochet dc2tog - double crochet two stitches together ss - slip stitch sts - stitches hdc - half double crochet Pattern (written in US terms): Pattern scaled for fit on a toddler. Wish Bubbles (Make one in each Yellow, Red, and Aqua) MC (or Chain 2) Round 1: sc 8 in the ring (or second chain from hook); ss to join Round 2: ch 1, 2 sc in each stitch, ss to join Round 3: ch 1, *1 sc, 2 sc in next stitch*, repeat around to marker, ss to join Round 4: ch 1, *1 sc, 1 sc, 2 sc*, repeat around to marker, ss to join Round 5: repeat Round 4 Round 6: ch 1, sc around, ss to join Round 7: ch 2, *1 dc, 2 dc, 1 dc*, repeat around, ss to ...

Springtime Cotton Throw

Image
Materials: Caron Cotton Cakes (I used 3) Size J Hook (6.00mm) Tapestry needle (for weaving ends) Scissors Terms to Know: ch - Chain sts - stitches sc - Single Crochet dc - Double Crochet Pattern (written in US terms): Chain 167; Row 1: sc in second chain from the hook, *chain 2 sts, skip 2 sts on starting chain, sc in next two sts*, repeat instructions between *...* until end of row; sc in last stitch; ch 2, turn. Row 2: DC in first stitch, *chain 2, skip 2 sts, DC in next two sc*, repeat *...* until end of row; DC in last stitch; ch 1, turn. Continue alternating row 1 and 2 until desired length. When desired length is reached, bind off and weave in ends. The Wordy Bit This super easy two row repeat works up so fast! If you prefer a bit more "stable" ends on your work, you can insert a row of sc on the starting chain and end--before and after the pattern. This gives a stronger edge to the work. Here's the difference between a thicker edge ...

Update Post Re: All Projects

Image
The Wordy Bit It's all wordy bit and pictures today. My life has been a whirlwind of projects, illness, wellness, craziness, and chaos since just before Christmas. I've got loads of projects going, and none of them seem to be getting done--at least, not fast enough! My baking experiments have been mostly failures, lately...which is very disheartening but! I'm learning. I'm trying new things even when I fail, and I'm making notes (extensive notes) so that I can track my successes and failures. I teased a sugar-free chocolate cake a while back and never came back around to it....it was a mess, and I ate one piece. My husband didn't like it, and I wouldn't even dare give it to my toddler.  I have a love/hate relationship with Devil's Food cakes, anyway**. This iteration is a modified version of my cupcake recipe. It didn't turn out well, so I made some notes on ways to alter the prep (not the ingredients) and see if that yields better results. ...

Dorian Baby Blanket

Image
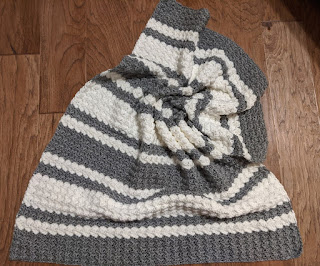
Materials: 5.5mm Crochet Hook 3 skeins Lion Brand Basic Stitch in White 3 skeins Lion Brand Basic Stitch in Silver Heather  Tapestry needle Scissors

Scraps into Scrubbies

Image
Materials: 100% Cotton Yarn  (I've used Bernat Handicrafter , Lion Brand 24/7 Cotton , and Lily Sugar n Cream Cotton ) 4mm or 5mm hook (whichever size the yarn calls for) Tapestry needle (for weaving ends) Scissors (I picked these up off Amazon, and they are adorable and amazing!) Abbreviations to Know: MC - Magic Circle Ch - chain SS - slip stitch HDC - half-double crochet DC - double crochet Pattern (written in US terms): Make a Magic Circle (or use my shortcut, written under the Wordy Bit, bc the Magic Circle never works for me) HDC 6 into the MC; ss to join Ch 2; HDC 2 into each stitch; ss to join Ch 2; *HDC 2 into first stitch; HDC in next 2 stitches*, repeat around; ss to join Ch 3; DC around; ss to join Weave in ends The Wordy Bit Substitute for Magic Circle: Chain 3; HDC 6 in the 3rd loop from the hook; slip stitch to join. Pull the non-working tail tight to close the gap. Simple as that! This pattern is a quick and easy way to use u...

Knot a Total Loss

Image
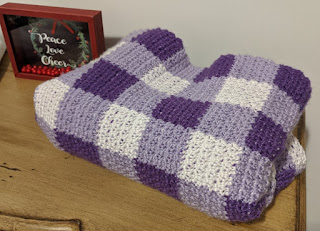
It's All Wordy Bit This Time: I've mentioned before that we celebrate failure, and that's true...to a point. No one in my family sets out to fail, but when we do, as long as we can learn from it, we celebrate it. There's no shame or harm in failing, as long as you learn from it. This was my first big "failure" in crochet, and I learned a good bit. Looks quite innocuous, doesn't it? I was attempting to do what the fine folks at Daisy Farm Crafts have perfected: the plaid or gingham blanket. I followed their formula: a set number of stitches and rows per color, the griddle stitch (alternating a single crochet and a double crochet), and three colors that blend. I even carried my yarn through (for the first time). And that proved my downfall.  I have a habit of watching television while I crochet, and sometimes that can alter my tension. I was watching something particularly suspenseful for a portion of this blanket, and my tension increased, a...

Toddler Messy Bun Hat with Variation

Image
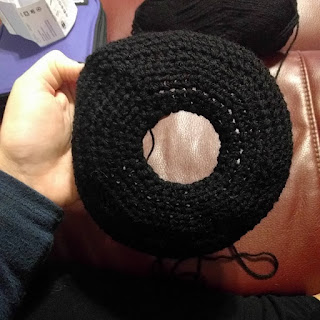
Toddler Messy Bun Hat with A Fun Variation Materials: Worsted weight yarn in desired color(s)

Lily Cowl

Image
Materials: One hank Cascade Sunseeker yarn , or any other DK weight yarn 4.5mm Crochet hook Tapestry Needle (for weaving ends)

Squishy Bathmat

Image
Materials: 6mm crochet hook 4.5mm crochet hook Worsted weight cotton yarn Tapestry needle (for weaving ends)

The Noro Cowl

Image
Materials: Noro Hakone , 1 skein (or any super bulky weight yarn)--roughly 108 yards Size P crochet hook Tapestry needle (for weaving ends) Pattern (written in US terms): Loosely chain 18 Row 1: starting on the 3rd chain from the hook, DC across (16 sts). Chain 2. Turn Row 2: DC across (16 sts). Chain 2. Turn. Repeat Row 2 roughly 28 times until 24 inches long (or desired length). Hold starting chain and final row together and line up stitches. SC ends together. Weave in ends. NOTE: Using the SC will create a thick seam on the inside of the cowl, which I wanted. If you'd prefer little to no seam, I'd suggest using a slip stitch to join the rows together. The Wordy Bit In 2018, I had the privilege of joining a crochet community that offers online classes and patterns for a monthly subscription. Part of the sign-up was an opportunity to receive a box of luxury/designer type yarns. Now, to be perfectly honest, these are not the type of yarn...

Good Gourds!

Image
The "small" version of my pumpkin set was made using the pattern here: Make It Sew Sweater Style Pumpkin I followed the instructions exactly (except for the color choices), and I found it to be an easy-to-read and easy-to-follow pattern. I haven't checked out any of the other patterns on the site, but if you do, let me know in the comments below! For the medium and large pumpkins, I altered the pattern, as shown below. The medium pattern is printed below, with separate notation for the large pumpkin in [brackets]. If I didn't do it that way, it'd take you a week to read it all.  Medium Pumpkin, 9" wide and 7" tall [Large Pumpkin, 11" wide and 9"tall] What You Need: 2 skeins of super bulky weight yarn (I used Lion Brand Hometown USA or Wool Ease Thick and Quick ) in the main pumpkin color 1 skein of super bulky weight yarn in the stem color Size N hook [ Size P hook ] Tapestry Needle for weaving ends Polyfill (or stuffing)...

Introduction

My musings, my arts, and myself Welcome to Whichcraft! I'm Jess, and here is the place where I am going to share my many loves with you. I cook; I bake; I crochet; I paint; I will hopefully soon learn to knit. You will be able to follow along with my progress through all these crafts, and that means that some posts will celebrate my stunning accomplishments! But, sometimes, I will share with you my incredible failures. When we fail, we learn, and I take that to heart. I also don't take myself too seriously.  All patterns shared here will either be: patterns that I have found from other bloggers (or Ravelry) that I will provide links to, or they will be original patterns that I have created. When I share an original pattern, I will also provide a link to purchase an ad-free, printer-friendly, downloadable version for a very low cost [NOTE: this is coming soon!]. Always, though, the patterns will be available for free here. Recipes, too, will be available for free (or link...