Posts

Showing posts with the label decor

Washable Water Balloons

Image
Materials: Bernat Blanket yarn  Size N/P hook (10.00mm) Tapestry needle (for weaving ends) Scissors Terms to Know: ch - chain st - stitch slst - slip stitch sc - single crochet dc - double crochet dc2tog - double crochet 2 together Pattern (written in US terms): Chain 3 Round 1: 8 DC in the third loop from the hook (Note: this is my "Magic Circle" shortcut); slst to join to the first st Round 2: Ch 2; 2 DC in each st all the way around; slst to join (16 total stitches in this round) Round 3: Ch 2; DC in each st all the way around; slst to join (16 sts total) Round 4:  Ch 2; DC in each st all the way around; slst to join (16 sts total) Round 5: Ch 2; DC2TOG all the way around; slst to join (8 sts total) Round 6: Ch 2; DC2TOG around; slst to join (4 sts total) Round 7: Ch 1; 2 SC in each st around; slst to join (8 sts total) Leave a long tail. Break the yarn and wrap the yarn several times around the "neck" of the balloon before tying off and weaving in the ends. (Thi...

Springtime Cotton Throw

Image
Materials: Caron Cotton Cakes (I used 3) Size J Hook (6.00mm) Tapestry needle (for weaving ends) Scissors Terms to Know: ch - Chain sts - stitches sc - Single Crochet dc - Double Crochet Pattern (written in US terms): Chain 167; Row 1: sc in second chain from the hook, *chain 2 sts, skip 2 sts on starting chain, sc in next two sts*, repeat instructions between *...* until end of row; sc in last stitch; ch 2, turn. Row 2: DC in first stitch, *chain 2, skip 2 sts, DC in next two sc*, repeat *...* until end of row; DC in last stitch; ch 1, turn. Continue alternating row 1 and 2 until desired length. When desired length is reached, bind off and weave in ends. The Wordy Bit This super easy two row repeat works up so fast! If you prefer a bit more "stable" ends on your work, you can insert a row of sc on the starting chain and end--before and after the pattern. This gives a stronger edge to the work. Here's the difference between a thicker edge ...

Update Post Re: All Projects

Image
The Wordy Bit It's all wordy bit and pictures today. My life has been a whirlwind of projects, illness, wellness, craziness, and chaos since just before Christmas. I've got loads of projects going, and none of them seem to be getting done--at least, not fast enough! My baking experiments have been mostly failures, lately...which is very disheartening but! I'm learning. I'm trying new things even when I fail, and I'm making notes (extensive notes) so that I can track my successes and failures. I teased a sugar-free chocolate cake a while back and never came back around to it....it was a mess, and I ate one piece. My husband didn't like it, and I wouldn't even dare give it to my toddler.  I have a love/hate relationship with Devil's Food cakes, anyway**. This iteration is a modified version of my cupcake recipe. It didn't turn out well, so I made some notes on ways to alter the prep (not the ingredients) and see if that yields better results. ...

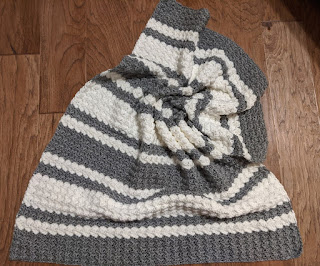
Dorian Baby Blanket

Image
Materials: 5.5mm Crochet Hook 3 skeins Lion Brand Basic Stitch in White 3 skeins Lion Brand Basic Stitch in Silver Heather  Tapestry needle Scissors

Knitting Update #1

Image
Materials: I'm using the Kilim Blanket knitting kit from We Are Knitters. It comes with: 7 balls of The Petite Wool (My color selection is: Color A - Ochre; Color B - Blush; Color C - Olive) 8mm Knitting Needles Tapestry Needles Pattern booklet The Wordy Bit It's official: I've started knitting! I have spent quite a lot of time since receiving my kit going over knitting videos and reading articles about technique and execution. I have practiced a long-tail cast on more times than I can count. But this past week, I went beyond my cast on and started making stitches! As a crocheter, and as someone who's never seen someone knit in person, figuring out how to handle the yarn and needles took a lot of getting used to. In fact, I'm still not quite comfortable with it. I'm a member of a knitting and crochet group on social media, so I asked all my ridiculous questions to them. Thankfully, many veteran knitters understood the confusion about basic yarn...

Good Gourds!

Image
The "small" version of my pumpkin set was made using the pattern here: Make It Sew Sweater Style Pumpkin I followed the instructions exactly (except for the color choices), and I found it to be an easy-to-read and easy-to-follow pattern. I haven't checked out any of the other patterns on the site, but if you do, let me know in the comments below! For the medium and large pumpkins, I altered the pattern, as shown below. The medium pattern is printed below, with separate notation for the large pumpkin in [brackets]. If I didn't do it that way, it'd take you a week to read it all.  Medium Pumpkin, 9" wide and 7" tall [Large Pumpkin, 11" wide and 9"tall] What You Need: 2 skeins of super bulky weight yarn (I used Lion Brand Hometown USA or Wool Ease Thick and Quick ) in the main pumpkin color 1 skein of super bulky weight yarn in the stem color Size N hook [ Size P hook ] Tapestry Needle for weaving ends Polyfill (or stuffing)...