Toddler Messy Bun Hat with Variation
Toddler Messy Bun Hat with A Fun Variation
Materials:
Worsted weight yarn in desired color(s)
My variation uses:
Bernat Satin Yarn in Sea Shell
Lion Brand Basic Stitch Yarn in Black
Lily Sugar 'n' Cream Yarn in White
H size hook (5.00mm)
Tapestry Needle
Scissors
My variation uses:
Bernat Satin Yarn in Sea Shell
Lion Brand Basic Stitch Yarn in Black
Lily Sugar 'n' Cream Yarn in White
H size hook (5.00mm)
Tapestry Needle
Scissors
Stitches to Know:
HDC = half-double crochet
sl st = slip stitch
ch = chain
Pattern (written in US terms):
For a basic messy bun hat:
CH 20; sl st to join end to beginning; ch1
Round 1: 27 sc around circle (wrap stitches around chain); sl st to join; ch 2 (27 sts)
Round 2: *2 HDC in one stitch, HDC, HDC*, repeat *..* around; sl st to join; ch 2 (36 sts)
Round 3: *2 HDC in one stitch, HDC, HDC, HDC*, repeat *..* around; sl st to join; ch 2 (45 sts)
Round 4: *2 HDC in one stitch, HDC, HDC, HDC, HDC*, repeat *..* around; sl st to join; ch 2 (54 sts)
Round 5: *2 HDC in one stitch, HDC, HDC, HDC, HDC, HDC*, repeat *..* around; sl st to join; ch 2 (63 sts)
Round 6: *2 HDC in one stitch, HDC, HDC, HDC, HDC, HDC, HDC*, repeat *..* around; sl st to join; ch 2 (72 sts)
Round 7-12: 72 HDC around; sl st to join; ch 2
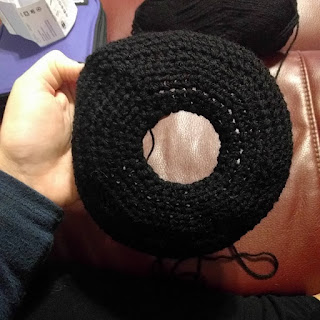
If you want a different color band, change color at Round 13. This is where I changed from black to Sea Shell in the example.
Round 13-20: 72 HDC around; sl st to join; ch 2.
After round 20 (or at desired hat length), fasten off.

Variation: Minnie Mouse-style hat.
Ears: For the ears, I made four circles (all the same size) and stitched two together for each ear. Like so:
Chain 2
Round 1: sc 6 in second chain from hook; join to first sc with sl st
Round 2: *2 sc, sc, 2 sc*, repeat between ** all the way around; sl st join
Round 3: *2 sc, sc, sc, 2 sc* repeat between ** around; sl st join
Continue adding an extra SC between the 2 SC every round until the ears are the proper size for your project. When finished, fasten off, but make sure to leave a long tail for sewing.
When all four circles are complete, take two and line them up. With one tail, sew one ear to the other. Either a mattress stitch or a whip stitch should work.

Once the ears are stitched together, place them on the hat. It may help to use stitch markers and attach them in different ways until you achieve the look you're going for. I set mine on either side of the messy bun opening. Using the other ear's long tail, sew the ears to the hat. Fasten off.
Polka-dots: For the polka-dots, I didn't want to use buttons, so I made small circles and stitched those on.
Chain 2
Round 1: sc 6 in second chain from hook; join to first sc with sl st. Pull tight and fasten off, leaving 8 inch tail for sewing.
Make as many polka-dots as necessary. I tried to be random with placement, and I think I made 20. I placed them on the band and on both sides of the bow.

Bow: In order to give the bow a bit of body, I crocheted two rounded rectangles, and stitched them together.
Make 2
Chain 34
Row 1: HDC in the 3rd chain from the hook, and across (32 stitches); chain 2; turn.
Row 2: HDC across; chain 2; turn.
Row 3-4: repeat Row 2.
Round 1: After chaining 2 and turning at the end of Row 4, HDC across. When you get to the end of the row, HDC 3 in the corner, turn the corner, and continue with HDC down the side. Wrap HDC all the way around the piece, placing 3 HDC in each corner. Join to beginning chain with a sl st.
Repeat Round 1 as many times as necessary to achieve the size bow desired (I did 3 rounds). I added the polka-dots to the bow before I stitched the bow pieces together. Once rounds are completed and polka-dots added, line up the rounded rectangles and sl st the short ends together. Leave an extremely long tail (roughly 15 inches).
Once polka-dots are added, shape bow by pinching in the center and wrapping the tail around the center of the bow until secure. Then, attach bow to hat and ears using the remainder of the tail.

The Wordy Bit
Whew! That was a long one, huh? Well, it definitely took longer to make the Minnie Mouse Messy Bun Hat than I thought it would. This was a commission request, and I'm happy to report that the little girl it was for absolutely loves it! I received a picture of her wearing it, and the smile on her face warmed my heart. I love making kids happy, which I think is part of the reason I started crocheting, to be honest.
There was some trial and error, but mainly, I used a picture from another blog as inspiration. Of course, there's loads of other ways you can change it up. You can do triangle ears and make it a cat hat. You can pick a character color and do the hat in a solid color and add eyes (crochet the circles or ovals out of white, then lay black or colored polka-dots on top). The options are pretty endless with these hats. I will say this: doing that much work with black yarn is hard on the eyes!
I had to take way more eye resting breaks with this project than any other project I've done. I highly recommend doing black yarn work on top of a white or other light colored towel. Definitely don't try to do it while wearing black leggings. Talk about eye strain!
As a reminder, this post contains affiliates links, and I may make money from any purchases completed.

Comments
Post a Comment