Posts

Showing posts with the label pattern

Washable Water Balloons

Image
Materials: Bernat Blanket yarn  Size N/P hook (10.00mm) Tapestry needle (for weaving ends) Scissors Terms to Know: ch - chain st - stitch slst - slip stitch sc - single crochet dc - double crochet dc2tog - double crochet 2 together Pattern (written in US terms): Chain 3 Round 1: 8 DC in the third loop from the hook (Note: this is my "Magic Circle" shortcut); slst to join to the first st Round 2: Ch 2; 2 DC in each st all the way around; slst to join (16 total stitches in this round) Round 3: Ch 2; DC in each st all the way around; slst to join (16 sts total) Round 4:  Ch 2; DC in each st all the way around; slst to join (16 sts total) Round 5: Ch 2; DC2TOG all the way around; slst to join (8 sts total) Round 6: Ch 2; DC2TOG around; slst to join (4 sts total) Round 7: Ch 1; 2 SC in each st around; slst to join (8 sts total) Leave a long tail. Break the yarn and wrap the yarn several times around the "neck" of the balloon before tying off and weaving in the ends. (Thi...

Maker Basics - Basic Stitches, B*tches

Image
Materials: Yarn Whatever size hook that is recommended by the yarn Scissors Patience The Wordy Bit Okay, so you've read over my broad-strokes on yarn. You went to the yarn store (online, hopefully) and found the yarn you want to create with. The label said you need a certain sized hook, so you got that, too....or you dove head first in and bought a bundle of hooks and notions. Either way, you've got yarn and hook in hand and you're ready to go! Right...? Well, if you're not, then this post may not be as informative as you were expecting. Maybe check back next week when I'm doling out my secrets on the perfect chicken nugget. Still here? Grab that yarn and hook, honey, and let's learn some basic stitches! The Slipknot Great band, but we're not here for the music. The foundation of any crochet project starts with a basic slipknot. So, I've got this picture here, and I'm going to explain my process. It seems simple to me, and I hope that...

Wish Pack Costume Prop

Image
Materials: Worsted weight yarn in: yellow, red, aqua, and white Polyfil Cardboard circles (3-4 inch diameter) 3/4" buttons in yellow, red, and aqua Stitch Marker (place in each ch 1 and move every row after ss) Tapestry needle Scissors Terms to Know: MC - Magic Circle sc - single crochet ch - chain dc - double crochet dc2tog - double crochet two stitches together ss - slip stitch sts - stitches hdc - half double crochet Pattern (written in US terms): Pattern scaled for fit on a toddler. Wish Bubbles (Make one in each Yellow, Red, and Aqua) MC (or Chain 2) Round 1: sc 8 in the ring (or second chain from hook); ss to join Round 2: ch 1, 2 sc in each stitch, ss to join Round 3: ch 1, *1 sc, 2 sc in next stitch*, repeat around to marker, ss to join Round 4: ch 1, *1 sc, 1 sc, 2 sc*, repeat around to marker, ss to join Round 5: repeat Round 4 Round 6: ch 1, sc around, ss to join Round 7: ch 2, *1 dc, 2 dc, 1 dc*, repeat around, ss to ...

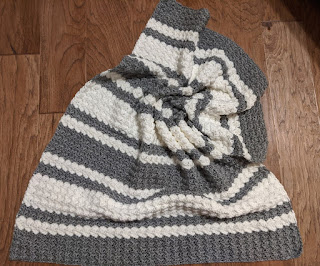
Dorian Baby Blanket

Image
Materials: 5.5mm Crochet Hook 3 skeins Lion Brand Basic Stitch in White 3 skeins Lion Brand Basic Stitch in Silver Heather  Tapestry needle Scissors

Scraps into Scrubbies

Image
Materials: 100% Cotton Yarn  (I've used Bernat Handicrafter , Lion Brand 24/7 Cotton , and Lily Sugar n Cream Cotton ) 4mm or 5mm hook (whichever size the yarn calls for) Tapestry needle (for weaving ends) Scissors (I picked these up off Amazon, and they are adorable and amazing!) Abbreviations to Know: MC - Magic Circle Ch - chain SS - slip stitch HDC - half-double crochet DC - double crochet Pattern (written in US terms): Make a Magic Circle (or use my shortcut, written under the Wordy Bit, bc the Magic Circle never works for me) HDC 6 into the MC; ss to join Ch 2; HDC 2 into each stitch; ss to join Ch 2; *HDC 2 into first stitch; HDC in next 2 stitches*, repeat around; ss to join Ch 3; DC around; ss to join Weave in ends The Wordy Bit Substitute for Magic Circle: Chain 3; HDC 6 in the 3rd loop from the hook; slip stitch to join. Pull the non-working tail tight to close the gap. Simple as that! This pattern is a quick and easy way to use u...